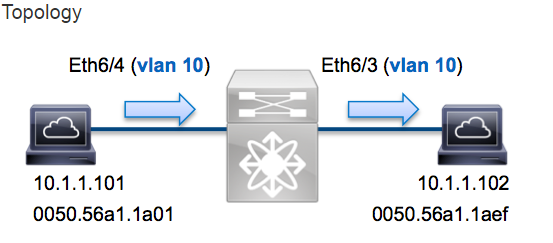
In this example a host on Vlan10 (10.1.1.101) port Eth6/4 sends an ICMP request to a host also on Vlan10 (10.1.1.102) off port Eth6/3. We will use ELAM to capture this single packet between the hosts. It’s important to remember that ELAM allows us to capture a single frame.
To perform an ELAM on the Nexus7000, you need to first attach to the appropriate module. This requires the network-admin privilege.
N7K# attach module 6

Attaching to module 6 ...

To exit type 'exit', to abort type '$.'

module-6#
Determine the ingress FE
We expect the traffic to ingress the switch on port Eth6/4. Checking the modules in the system we can see that module 6 is an F2 module. Remember, the Nexus 7000 is fully distributed and the modules, not the supervisor, are responsible for making the forwarding decision for dataplane traffic.
N7K# show module 6

Mod  Ports  Module-Type                         Model              Status

---  -----  ----------------------------------- ------------------ ----------

6    48     1/10 Gbps Ethernet Module           N7K-F248XP-25E     ok
For F2 modules, we want to perform the ELAM on the L2 forwarding engine (FE) with internal codename Clipper. Note that the L2 FE data bus (DBUS) contains original header information before the L2 and L3 lookup and the result bus (RBUS) contains the results after both L3 and L2 lookups.
The F2 module has 12 forwarding engines per module. We need to determine which Clipper ASIC is the FE for port Eth6/4. We can use the following command to verify:
module-6# show hardware internal dev-port-map

--------------------------------------------------------------

CARD_TYPE:         48 port 10G

>Front Panel ports:48

--------------------------------------------------------------

 Device name             Dev role              Abbr num_inst:

--------------------------------------------------------------

> Clipper FWD            DEV_LAYER_2_LOOKUP     L2LKP  12

+-----------------------------------------------------------------------+

+----------------+++FRONT PANEL PORT TO ASIC INSTANCE MAP+++------------+

+-----------------------------------------------------------------------+

FP port |  PHYS | MAC_0 | L2LKP | L3LKP | QUEUE |SWICHF

...

   3       0       0       0       0       0       0

   4       0       0       0       0       0       0
From the output above, we can see that Eth6/4 is on Clipper (L2LKP) instance 0.
module-6# elam asic clipper instance 0

module-6(clipper-elam)# layer2

module-6(clipper-l2-elam)#
Configure the trigger
For this example we want to capture the frame based off source and destination IPv4 address so we will only specify those values.
Clipper requires a trigger to be set for the DBUS and the RBUS. Different from M-series modules, there is no requirement to specify a packet buffer instance which helps simplify the RBUS trigger.
DBUS Trigger
module-6(clipper-l2-elam)# trigger dbus ipv4 ingress if source-ipv4-address 10.1.1.101
 destination-ipv4-address 10.1.1.102
RBUS Trigger
module-6(clipper-l2-elam)# trigger rbus ingress if trig
Start the capture
Now that the ingress FE has been selected and we’ve configured our trigger, we can start the capture
module-6(clipper-l2-elam)# start
We can check the status of the ELAM via the status command.
module-6(clipper-l2-elam)# status

ELAM instance 0: L2 DBUS Configuration: trigger dbus ipv4 ingress if source-ipv4-address 10.1.1.101
 destination-ipv4-address 10.1.1.102

L2 DBUS Armed

ELAM instance 0: L2 RBUS Configuration: trigger rbus ingress if trig

L2 RBUS Armed
Once the frame matching the trigger has been received by the FE we will see the ELAM as triggered:
module-6(clipper-l2-elam)# status

ELAM instance 0: L2 DBUS Configuration: trigger dbus ipv4 ingress if source-ipv4-address 10.1.1.101
 destination-ipv4-address 10.1.1.102

L2 DBUS Triggered

ELAM instance 0: L2 RBUS Configuration: trigger rbus ingress if trig

L2 RBUS Triggered
Interpret the results
We can display the results via the show dbus and show rbus command. Below is an excerpt of the ELAM data that is most relevant in this example.
(some output omitted)

module-6(clipper-l2-elam)# show dbus

--------------------------------------------------------------------

                       L2 DBUS CONTENT - IPV4 PACKET

--------------------------------------------------------------------

...

vlan                : 0xa             destination-index   : 0x0

source-index        : 0x3             bundle-port         : 0x0

sequence-number     : 0x3f            vl                  : 0x0

...

source-ipv4-address: 10.1.1.101

destination-ipv4-address: 10.1.1.102

destination-mac-address 0050.56a1.1aef

source-mac-address: 0050.56a1.1a01

module-6(clipper-l2-elam)#  show rbus

--------------------------------------------------------------------

                       L2 RBUS INGRESS CONTENT

--------------------------------------------------------------------

l2-rbus-trigger     : 0x1             sequence-number     : 0x3f

di-ltl-index        : 0x2             l3-multicast-di     : 0x0

source-index        : 0x3             vlan-id             : 0xa
From the DBUS data above we can validate the frame was received on Vlan10 (vlan: 0xa) with a source MAC of 0050.56a1.1a01 and a destination MAC of 0050.56a1.1aef. We can also see that this is an IPv4 frame sourced from 10.1.1.101 destined to 10.1.1.102. There are several other fields not included in this output such as TOS value, IP flags, IP length, L2 frame length, etc… that are also often useful to check.
We can also validate what port the frame was received on via the source-index (the source LTL). For Nexus 7000, we can map an LTL to a port or group of ports via the following command:
N7K# show system internal pixm info ltl 0x3

Type            LTL

---------------------------------

PHY_PORT       Eth6/4
The above output shows that source-index of 0x3 maps to port Eth6/4. This confirms that the frame was received on Eth6/4.
From the RBUS data we can validate that the frame was switched on Vlan10 (vlan-id: 0xa). We can confirm the egress port from the di-ltl-index (destination LTL):
N7K# show system internal pixm info ltl 0x2

Type            LTL

---------------------------------

PHY_PORT       Eth6/3
The above output shows that the di-ltl-index of 0x2 maps to port Eth6/3. This confirms that the frame was switched out Eth6/3.
Further information
Elam is great tool for troubleshooting potential problems. However the command syntax differs from device to device and line card to line card. Here are some more examples of ELAM for another platforms.
F3 line card – ASIC codename FLANKER:
elam asic flanker instance 0
layer2
trigger dbus ipv4 ingress if source-ipv4-address 10.244.165.2 destination-ipv4-address 10.244.165.27
trigger rbus ingress if trig
start
M1 line card – ASIC codename eureka. Notice that in M1 card you have to specify for RBUS also packet bus – pb. It is recommended to start with pb1 and if it not triggered then continue with pb2
elam asic eureka instance 1
trigger dbus dbi ingress ipv4 if source-ipv4-address 10.244.165.2 destination-ipv4-address
 10.244.165.27 rbi-corelate
trigger rbus rbi pb2 ip if cap2 1
start
Nexus 5672. Notice that ELAM is not supported for Nexus 5000 and 5500. However 5672 is really a Nexus 6000 not a Nexus 5000. It is using nxos of Nexus 6000 and that is supported
elam slot all
trigger lu ingress ipv4 if source-ipv4-address_ipv4 10.244.165.1 destination-ipv4-address_ipv4 10.244.165.27
start capture
show capture lu
show capture rs
trigger lu egress ipv4 if source-ipv4-address_ipv4 10.244.165.1 destination-ipv4-address_ipv4 10.244.165.27
start capture
show capture lu
show capture rs